Quantcast
Channel: Hakin9 – IT Security Magazine
Viewing all 612 articles
Browse latest View live

Stowaway: Multi-hop proxy tool for security researchers and pentesters

$
0
0

Stowaway is Multi-hop proxy tool for security researchers and pentesters. Users can easily proxy their network traffic to intranet nodes (multi-layer).

Note: The files under demo folder are Stowaway's beta version,it's still functional, you can check the detail by README.md file under the demo folder.

This tool is limited to security research and teaching, and the user bears all legal and related responsibilities caused by the use of this tool! The author does not assume any legal and related responsibilities!

Features

  • obvious node topology
  • multi-hop socks5 traffic proxy
  • multi-hop ssh traffic proxy
  • remote interactive shell
  • network traffic encryption with AES-256(CBC mode)
  • support macos and linux

Usage

Stowaway can be executed as two kinds of mode: admin & agent. If you don't want to compile the project by yourself, you can check the release tag to get ONE!

Simple example:

Admin mode:./stowaway admin -l 9999 -s 123
  
  Meaning:
  
  admin  It means Stowaway is started as admin mode
  
  -l     It means Stowaway is listening on port 9999 and waiting for incoming connection

  -s     It means Stowaway has used 123 as the encrypt key during the communication
  
  Be aware! -s option's value must be as same as the agents' 

  For now, there are only three options above are supported!
agent mode: ./stowaway agent -m 127.0.0.1:9999 -l 10000 --startnode -s 123 -r
  
  Meaning:
  
  agent It means Stowaway is started as agent mode 
  
  -m    It means Stowaway's monitor node's address (In this case,it's the node we started above)
  
  -l    It means Stowaway is listening on port 10000 and waiting for incoming connection 

  -s    It means Stowaway has used 123 as the encrypt key during the communication 

  --startnode  It means Stowaway is started as FIRST agent node(if the node is the first one , you MUST add this option!!! And there are two submode of agent mode,if you want to start the second, third one....., just remove this option)

  -r It means you want to start the node in reverse mode(For instance: you can add node 2 into the net via node 1 actively connect to node 2, instead of node 1 just waiting for the connection from node 2 )

  Be aware! -s option's value must be as same as the agents' 

 For now, there are only five options above are supported!

Example

Admin:

Startnode:

First simple Node(setting as reverse mode:

Now, use admin node and type in "use 1" -> "connect 127.0.0.1:10001", then you can add node 1 into the net. Second simple Node:

When all agent nodes connected, check the topology in admin:

Now we manipulate the second simple node through admin:

Open the remote interactive shell:

Now you can use interactive shell (the second simple node's) through admin.

Start socks5 proxy service:

Now you can use the admin's port 7777 as the socks5 proxy service.

And it can proxy your traffic to the second simple node and the second simple node will do its work as socks server When you want to shut down this socks5 service, just type in "stopsocks" under this mode to turn off it).

Open ssh:

And it can proxy your ssh traffic to the second simple node and the second simple node will do its work as ssh client.

Note: In this function, you can type in pwd to check where you currently are:

For more detail, just type help to get further informations

TODO

  • Network traffic encryption
  • Method to turn off socks5 proxy
  • Reconnection
  • Clean codes, optimize logic
  • Add cc function
  • Add reverse connect mode

Attention

  • This porject is coding just for fun , the logic structure and code structure are not strict enough, please don't be so serious about it
  • When the admin offline, all agent nodes will offline too(maybe it will be changed in future)
  • When one of the agents offline, the agent nodes after it will offline
  • Once the admin started, you need to connect at least one agent node to it before you do any operations
  • If you want to compile this project for supporting more platform, you can use go build -ldflags="-w -s" to do that
  • Temporarily does not support Windows

Thanks


Main website: https://github.com/ph4ntonn/Stowaway/blob/master/README_EN.md

The post Stowaway: Multi-hop proxy tool for security researchers and pentesters appeared first on Hakin9 - IT Security Magazine.


TuxResponse - Linux Incident Response

$
0
0

TuxResponse is incident response script for linux systems written in bash. It can automate incident response activities on Linux systems and enable you to triage systems quickly, while not compromising with the results. Usually corporate systems would have some kind of monitoring and control, but there are exceptions due to shadow IT and non-standard images deployed in corps. What amounts to typing of 10 commands with trial end testing, can be done in a press of a button.

Tested on:

  • Ubuntu 14+
  • CentOS 7+

Primary purpose:

  • Take advantage of built-in tools and functionality in Linux (tools like dd, awk, grep, cat, netstat, etc)
  • Reduce the amount of commands incident responder needs to remember/use in response scenario.
  • Automation

External tools in the package:

  • LiME
  • Exif
  • Chckrootkit
  • Yara + Linux scanning rules (needs network to fetch the repo)

Example automation:

INSTALL LiME
function init_lime(){

  if [ -f /usr/bin/yum ]; then
    yum -y install make kernel-headers kernel-devel gcc
  elif [ -f /usr/bin/apt-get ]; then
    apt-add-repository universe
    apt-get -y install make linux-headers-$(uname -r) gcc
  fi

  rm -f /tmp/v1.8.1.zip
  wget -P/tmp https://github.com/504ensicsLabs/LiME/archive/v1.8.1.zip
  unzip /tmp/v1.8.1.zip
  rm -f /tmp/v1.8.1.zip

  pushd LiME-1.8.1/src
    make
    mv lime-*.ko /tmp/lime.ko
  popd
  rm -rf LiME-1.8.1
}

When responding to incidents, if you have to install LiME by manually typing all the commands, that will slow you down significantly.

Functionality

1) Live Response

1) Footprint System

1)System info, IP, Date, Time, local TZ, last boot - 'hostnamectl; who -b; uname -a; uptime; ifconfig; date; last reboot'

2) File System Tools

    1)Check mounted filesystems -'df -h'
    2)Hash executables (MD5) - 'find /usr/bin -type f -exec file "{}" \; | grep -i "elf" | cut -f1 -d: | xargs -I "{}" -n 1 md5sum {}'
    3)Modified files - 'modified_files_period_select' (calling a function in tuxresponse.sh)
    4)List all hidden directories - 'find / -type d -name "\.*"'
    5)Files/dirs with no user/group name - 'find / \( -nouser -o -nogroup \) -exec ls -l {} \; 2>/dev/null'
    6)Changed files from packages -'packaged_files_changed' (calling a function in tuxresponse.sh)

3) YARA, CHKROOTKIT, EXIFTool

1) Check for rootkits - runs 'chkrootkit'
2) Yara scan - calling a function tuxresponse.sh 'yara_select' (scans system with all YARA linux rules available in master repo)
3) EXIFTool - calling a function tuxresponse.sh 'exiftool_select' (installs EXIFTool)

4) Process Analysis Tools

1) List running processes - 'ps -axu'
2) Deleted binaries still running - 'ls -alR /proc/*/exe 2> /dev/null | grep deleted'
3) Active Network Connections (TCP, UDP) - 'ss -tunap | sed "s/[ \t]\+/|/g"'
4) Dump process based on PID - 'dump_process_select' (calling a function in tuxresponse.sh)
          1) Enter PID to dump: **(this is the command executed - gcore -a -o "${DUMP_FILE}" ${DUMP_PID} )**
5) Process running from /tmp, /dev - 'ls -alR /proc/*/cwd 2> /dev/null | grep -E "tmp|dev"'

5) Network Connections Analysis

1) List all active network connections/raw sockets - 'netstat -nalp; netstat -plant'

6) Users

1) List all users connected to the system - 'w' 
2) Get users with passwords - 'getent passwd'

7) Bash

1) Check bash history file - 'cat ~/.bash_history | nl'

8) Evidence Of Persistence

1) List All Cron Jobs - 'list_all_crontab' (calling a function in tuxresponse.sh)
2) List All on-startup/boot programs - 'list_all_onstartup' (calling a function in tuxresponse.sh)

9) Dump All Logs (/var/log)

1) Dump Users .bash_history - 'cat_all_bash_history' (calling a function in tuxresponse.sh)
2) Find logs with binary inside -  'grep [[:cntrl:]] /var/log/*.log'

2) Connect To Target - use SSH to transfer script and analyze remote system.

That option enables you to connect to a remote system, copy over all scripts and tools and analyze the system.

3) Take Memory Dump (LKM LiME)

That option enables you to compile LiME from source and dump the RAM memory off the system. This is the easiest way to do it as the other way around would be to compile from source for all major kernel versions and insert the LKM.

4) Take disk image (DD)

That option enables you to do a full disk image of the target system using well-known tool - dd. The function is taking source and destination as parameters and inserts them in the following command 'dd if=${IMAGE_IN} | pv | dd of='${IMAGE_OUT}' bs=4K conv=noerror,sync'. If you're investigating remote system, the script is going to copy itself there. Then if the parameter ${TARGET_HOST} is set, then the script is going to download the image to analyst system using this command >> "ssh -p${TARGET_PORT} ${TARGET_USER}@${TARGET_HOST} 'dd if=${IMAGE_IN} bs=4K conv=noerror,sync'| pv | dd of='${IMAGE_OUT}'" (im heavily using pv to make sure progress is tracked)

5) Generate HTML Report

Everything you do is recorded in text files, thus easy to go back and look at the output. The beauty of this is that you can upload it in your favourite log analysis tools and make sense of it at later stage. On top of that, you can use that function to generate HTML report and look at the command-generated output in a more human readable form.

6) Install Software

Install binaries that are required by the script to function correctly.
      1) Dependancies
      2) Yara and rules
      3) ExifTool
      4) Init check
      5) chckrootkit
      6) LiME

More at: https://github.com/la3ar0v/TuxResponse

The post TuxResponse - Linux Incident Response appeared first on Hakin9 - IT Security Magazine.

Covenant the .NET based C2 on Kali Linux | by Dan Dieterle

$
0
0

Covenant the .NET based C2 on Kali Linux

There are many Command and Control Frameworks for Pentesters and Red Teamers to use. Covenant is a nice .NET based C2 environment that works great on Kali Linux. In this article we will cover installing and the very basic usage of Covenant.

When using Covenant, you first create “listeners”. These listen for incoming connections from “launchers”. Next, you create “launchers”, or basically, the exploit payloads. When the launchers are run on a target system, they connect back to Covenant as “Grunts”. Lastly, you control the Grunts by interacting with them and running “Tasks”.

Covenant uses SharpSploit for the Tasks. SharpSploit is basically a .NET exploitation library written in C#, that is similar to the PowerSploit project.

Use 64 bit Kali only, the install errors out on 32 bit Kali

Installing Covenant

Tool Author: Ryan Cobb

Tool Website: https://github.com/cobbr/Covenant

Install and usage of Covenant is heavily and thoroughly documents on the tool WiKi site at https://github.com/cobbr/Covenant/wiki/Installation-And-Startup. I highly recommend the reader use and follow this site for the latest instructions. As such, this will just be a quick overview of installing Covenant.

Download and install Covenant

NOTE: You need two dashes in front of the “recurse-submodules” command. WordPress combines them into one.

Next, Download and install DotNet core version 2.2 SDK from Microsoft. Instructions can be found here:

https://dotnet.microsoft.com/download/dotnet-core/2.2

Instructions copied below for your convenience:

If this doesn’t work, you are probably trying to us 32 bit or the wrong platform (ARM vs amd64).

Lastly, just build and run Covenant:

  • cd Covenant/Covenant
  • dotnet build
  • dotnet run

You will now be presented with the Covenant Login Screen:

At this point you will create an admin user for Covenant.

  • Enter a username and password

And that’s it, Covenant is ready for use:

Now we need to create a Listener, build a launcher and get ready for shells!

Build a Listener

Covered at https://github.com/cobbr/Covenant/wiki/Listeners

This will only allow you to create an HTTP listener, you can create more involved listeners with C2 Bridge, see the tool documentation.

  • On the Covenant Menu, click “Listeners”

All we need to do is change the “ConnectAddress” to the Kali Linux IP Address.

  • When finished, click “+ Create”

A new listener should now show up on the Listeners Dashboard

You can click on the Listener name to get info on the listener and Stop/ Start or Delete it.

Generate a Launcher

Launcher Wiki page: https://github.com/cobbr/Covenant/wiki/Launchers

Now all we need to do is create our Launcher to run on the target system.

  • Click “Launchers”
  • Pick a Launcher type

Check out the Launcher Wiki page for an explanation of each type. Let’s create an MsBuild launcher.

  • Click “MsBuild”
  • Generate
  • Download

And That’s it! Download the file and run it using MSBuild on the target system. If the system is vulnerable, you get a shell:

If it runs successfully, a new Grunt, or remote shell connection will show up in the Covenant Dashboard under “Grunts”:

  • Click on the Grunt name
  • Click “Interact” to interact with the Grunt

Here you can run tasks, enter the task name and then send it.

In the screen above, I have run many tasks, the last runs the Keylogger for 10 seconds. Click on “Taskings” and the Task name to view the output of each command

Conclusion

In this article we quickly covered installing and using the Covenant .NET based Command and Control framework. This is a very heavily developed and well working framework. If you haven’t seen it, I highly recommend you try it out.

I had mixed results running this “out of the box” against a Windows 10 system. Microsoft Defender detects and blocks the launchers pretty quickly. So advanced users may need to modify the payloads. This may or may not work flawlessly against other anti-viruses with no modifications.        

The post Covenant the .NET based C2 on Kali Linux | by Dan Dieterle appeared first on Hakin9 - IT Security Magazine.

AWS Report - a tool for analyzing amazon resources

$
0
0

Features

  • Search iam users based on creation date
  • Search buckets public
  • Search security group with inbound rule for 0.0.0.0/0
  • Search elastic ip dissociated
  • Search volumes available
  • Search AMIs with permission public
  • Search internet gateways detached

Install requirements

pip3 install --user -r requirements.txt

Environment variables

IAM_MAX_ACCESS_KEY_AGE default is 60 days.

Usage

Usage: aws_report.py [OPTIONS]

Options:
  --s3           Search buckets public in s3
  --iam          Search iam users based on creation date
  --sg           Search security groups with inbound rule 0.0.0.0
  --elasticip    Search elastic IP not associated
  --volumes      Search volumes available
  --ami          Search AMIs with permission public
  --owner TEXT   Defines the owner of the resources to be found
  --igw          Search internet gateways detached
  --region TEXT  Defines the region of resources
  --help         Show this message and exit.

Examples

python3 aws_report.py --s3
python3 aws_report.py --iam
python3 aws_report.py --owner 296193067842 --ami

Running in Docker

docker run -it -e AWS_ACCESS_KEY_ID=you-access-key -e AWS_SECRET_ACCESS_KEY=you-secret-key gmdutra/aws-report --s3

Contact

[+]Email     gmdutra.eu@gmail.com
[+]Linkedin  linkedin.com/in/gmdutra
[+]Twitter   twitter.com/gmdutrax

More: https://github.com/gmdutra/aws-report

The post AWS Report - a tool for analyzing amazon resources appeared first on Hakin9 - IT Security Magazine.

Blockchain for Business: How This Booming Technology is Benefiting Corporations| by the Rider University

$
0
0

Blockchain for Business: How This Booming Technology is Benefiting Corporations

According to Deloitte’s 2018 survey of over 1,000 business executives, 39% of respondents stated their companies would invest at least $5 million in blockchain technology in the next year. Blockchain is a revolutionary technology with the potential to disrupt companies across a wide range of industries. Therefore, business owners should understand the many potential applications that can support and help grow their businesses.

How the implementation of blockchain technology can help businesses grow.

Rider University

Blockchain Technology Explained

Blockchain is a technology that records information about a transaction on a distributed, decentralized, public ledger. Each transaction is then recorded in a digital “block” that is added to the existing chain of information. Blockchain technology is revolutionizing security with its ability to transfer digital ownership in a decentralized manner that does not require trust in a central entity.

Key Components

To understand blockchain, it’s important to know its essential components. The ledger is a digital record book of transactions conducted on a blockchain. The term mining refers to the process of adding blocks to the blockchain via solving a complex mathematical problem. A wallet is a component containing public and private cryptographic keys used in transactions, which is a payment recorded in the blockchain’s ledger. A public key is a shortened version of a private key and the user’s digital signature used in a transaction. Ultimately, building the blocks rewards computers with cryptocurrency; digital currency that users can use to make purchases using the blockchain.

How It Works

The first step in the process involves a user making a transaction with cryptocurrency. Then a network of computers works to solve the complex math problem to confirm transaction time, dollar amount, and participants. Next, the transaction is publicly recorded in a block, given a unique ID code called a hash, and attached to the previous block. Finally, each networked computer stores an identical copy of the blockchain ledger.

Benefits and Applications of Blockchain

Blockchain technology offers a host of benefits to businesses and organizations of all sizes: greater efficiency, improved supply chain management and increased transparency.

Benefits and Drawbacks of Blockchain

There is plenty of upside to using blockchain. Blockchain’s decentralized data greatly enhances record security. It also doesn’t store identifying information, making the system highly anonymous. Because access to blockchain’s network of computers requires the solving of a complex math problem, there’s a built-in level of trust involved. Blockchain also receives high marks for its accuracy and confidentiality.

There are also a few negatives. One such hindrance is the lack of scalability, as it’s difficult to maintain security and privacy as the number of transactions increase. Also, metadata and statistical analysis could result in pattern recognition that could cause privacy issues, despite blockchain’s security strength. Other limitations include its lack of suitability for all applications and its lack of regulation.

A Myriad of Applications

One of the key ways to apply blockchain is through supply chain management. In this instance, blockchain can track the origin, quantity and movement of goods, simplify transfers, and increase transparency and efficiency. A second application can be quality assurance, as it can boost product safety and can be used to conduct investigations with greater ease. Accounting departments may find it handy, as it can safeguard data from tampering, increase efficiency, and it follows a highly traceable audit trail. Additionally, blockchain can be used to track energy supply and usage and can improve the monitoring of clean energy. Finally, blockchain can be utilized for smart contracts, as they can automatically validate, sign and enforce contracts – a time- and money-saving process that could eliminate the need for mediators

Incorporating Blockchain Technology in Business

Large corporations such as IBM have developed blockchain platforms that can be used by businesses of all sizes. Applications extend to a variety of industries and business functions.

Blockchain in the Real World

IBM’s blockchain platform is built on an open-source framework called Hyperledger Fabric. It supports the full life cycle of a multiorganization blockchain network, and it can be used on-premises with a cloud provider or in a multi-cloud environment. It boasts numerous applications, including global trade, cross-border payments, and food.

American Express is also getting into the blockchain business. Their blockchain will offer SKU-level data for every product purchased via promotion. The info revealed to AMEX will include time, location, item bought, and purchase method, and any data shared with merchants will remain anonymous and secure. The blockchain’s purpose will be to offer more relevant promotions, and to form deeper relationships with merchants.

Lockheed Martin is another leading corporation involved with blockchain. They’re working with Guardtime Federal to integrate blockchain technology that will help manage supply chain risk, support systems engineering and software development, address the threat of data manipulation and cyberattacks, and increase rates of mission survival.

Conclusion

More and more applications of blockchain technology are being developed, creating a myriad of opportunities for a variety of industries. Business owners and leaders need to stay aware of developments in blockchain tech and actively consider implementing the technology into daily activities to benefit and grow their businesses.


Originally posted: https://online.rider.edu/blog/blockchain-for-business-how-this-booming-technology-is-benefiting-corporations/ 

The post Blockchain for Business: How This Booming Technology is Benefiting Corporations| by the Rider University appeared first on Hakin9 - IT Security Magazine.

XposedOrNot - tool to search an aggregated repository of xposed passwords comprising of ~850 million real time passwords.

$
0
0

XposedOrNot (XoN) tool is to search an aggregated repository of xposed passwords comprising of ~850 million real time passwords. Usage of such compromised passwords is detrimental to individual account security.

What is Xposed Passwords?

The main aim of this project is to give a free platform for the general public to check if their password is exposed and compromised.

This massive password collection is an accumulation of real passwords exposed in various data breaches around the world. Passwords are curated from exposed breaches like Collection #1, Yahoo, etc. Adding to that, passwords are also commonly exposed in "pastes" in pastebin.com. We have taken more than 40,000 such exposures and that is again added to this huge list.

The collated passwords are hashed with a highly secure hashing algorithm SHA-3 ( Keccak-512 ), and stored in a one way hash for verification. No passwords are stored in plain text and the process of checking anonymously is explained in detail in our blog post, 850 million passwords for free explaining the technical and operational controls enforced for enhancing the security posture. Feel free to go through the same.

How to install?

git clone https://github.com/Viralmaniar/XposedOrNot.git
cd XposedOrNot
pip install -r requirements.txt
python XposedorNot.py

How to interpret an output?

The output will consist of JSON output for easy reference. Primary reasons for giving an output in JSON instead of a yes/no is to ensure that this can be further used by people to develop and improve on the huge list of real time exposed passwords aggregated here.

Alright, the first element "anon" is added to all password hashes stored in XoN for enabling privacy conscious users to search as well. Second element "char" is a list of characteristics of the password, which can be further used for understanding the strength of the password to know if this will meet the requirements of applications in need. Many websites have policies on the use of selecting passwords based on number of characters, mixture of alphabets, numbers and special characters.

The following table explains a bit more about the characteristics in simple terms:

Alphabet Description
Digits Count of numbers
Alphabets Count of alphabets
Special chars Count of special chars
Length Length of the password

The last one "count" denotes the number of times, this password was observed in the collected xposed data breaches. For a comprehensive list of all xposed websites, please visit Xposed websites-XoN.

Also, one another point to note is the use of Keccak-512 hashing for searching and storing data in XoN. Traditional hashing algorithms like MD5 and SHA1 are currently deprecated and also considering the enormous number of records exposed, I have gone ahead with Keccak-512 hashes.

Yes, Keccak-512 is 128 characters long and it consumes more storage.

Two sample Keccak-512 hashes given for easy reference:

test - 1e2e9fc2002b002d75198b7503210c05a1baac4560916a3c6d93bcce3a50d7f00fd395bf1647b9abb8d1afcc9c76c289b0c9383ba386a956da4b38934417789e pass - adf34f3e63a8e0bd2938f3e09ddc161125a031c3c86d06ec59574a5c723e7fdbe04c2c15d9171e05e90a9c822936185f12b9d7384b2bedb02e75c4c5fe89e4d4

Sample output on not finding the matching password hash:

{
  "Error": "Not found"
}

Collected Passwords timeline - thanks to DevaOnBreaches

Detailed list can be seen here: https://xposedornot.com/xposed

Questions?

Twitter: @ManiarViral
LinkedIn: https://au.linkedin.com/in/viralmaniar

Credit

XposedOrNot is maintained by DevaOnBreaches. Big thanks for creating an API for your service. You can connect with him at https://www.devaonbreaches.com

The post XposedOrNot - tool to search an aggregated repository of xposed passwords comprising of ~850 million real time passwords. appeared first on Hakin9 - IT Security Magazine.

WAFW00F - The Web Application Firewall Fingerprinting Tool

$
0
0

How does it work?

To do its magic, WAFW00F does the following:

  • Sends a normal HTTP request and analyses the response; this identifies a number of WAF solutions.
  • If that is not successful, it sends a number of (potentially malicious) HTTP requests and uses simple logic to deduce which WAF it is.
  • If that is also not successful, it analyses the responses previously returned and uses another simple algorithm to guess if a WAF or security solution is actively responding to our attacks.

For further details, check out the source code on our main repository.

What does it detect?

WAFW00F can detect a number of firewalls, a list of which is as below:

$ wafw00f -l

                                                                      
                ______                                                
               /      \                                               
              (  W00f! )                                              
               \  ____/                                               
               ,,    __            404 Hack Not Found                 
           |`-.__   / /                      __     __                
           /"  _/  /_/                       \ \   / /                
          *===*    /                          \ \_/ /  405 Not Allowed
         /     )__//                           \   /                  
    /|  /     /---`                        403 Forbidden
    \\/`   \ |                                 / _ \ 
    `\    /_\\_              502 Bad Gateway  / / \ \  500 Internal Error
      `_____``-`                             /_/   \_\

                        ~ WAFW00F : v2.0.0 ~
        The Web Application Firewall Fingerprinting Toolkit

[+] Can test for these WAFs:

  WAF Name                      Manufacturer
  --------                      ------------

  ACE XML Gateway               Cisco
  aeSecure                      aeSecure
  AireeCDN                      Airee
  Airlock                       Phion/Ergon
  Alert Logic                   Alert Logic
  AliYunDun                     Alibaba Cloud Computing
  Anquanbao                     Anquanbao
  AnYu                          AnYu Technologies
  Approach                      Approach
  AppWall                       Radware
  Armor Defense                 Armor
  ArvanCloud                    ArvanCloud
  ASP.NET Generic               Microsoft
  ASPA Firewall                 ASPA Engineering Co.
  Astra                         Czar Securities
  AzionCDN                      AzionCDN
  Azure Front Door              Microsoft
  Barikode                      Ethic Ninja
  Barracuda                     Barracuda Networks
  Bekchy                        Faydata Technologies Inc.
  Beluga CDN                    Beluga
  BinarySec                     BinarySec
  BitNinja                      BitNinja
  BlockDoS                      BlockDoS
  Bluedon                       Bluedon IST
  CacheWall                     Varnish
  CacheFly CDN                  CacheFly
  Comodo cWatch                 Comodo CyberSecurity
  Chuang Yu Shield              Yunaq
  Cloudbric                     Penta Security
  Cloudflare                    Cloudflare Inc.
  Cloudfloor                    Cloudfloor DNS
  Cloudfront                    Amazon
  CrawlProtect                  Jean-Denis Brun
  DataPower                     IBM
  DenyALL                       Rohde & Schwarz CyberSecurity
  Distil                        Distil Networks
  DOSarrest                     DOSarrest Internet Security
  DotDefender                   Applicure Technologies
  Edgecast                      Verizon Digital Media
  Eisoo Cloud Firewall          Eisoo
  Expression Engine             EllisLab
  BIG-IP AppSec Manager         F5 Networks
  BIG-IP AP Manager             F5 Networks
  Fastly                        Fastly CDN
  FirePass                      F5 Networks
  FortiWeb                      Fortinet
  Greywizard                    Grey Wizard
  Huawei Cloud Firewall         Huawei
  HyperGuard                    Art of Defense
  Imunify360                    CloudLinux
  Incapsula                     Imperva Inc.
  IndusGuard                    Indusface
  Instart DX                    Instart Logic
  ISA Server                    Microsoft
  Jiasule                       Jiasule
  Kona SiteDefender             Akamai
  KS-WAF                        KnownSec
  KeyCDN                        KeyCDN
  LimeLight CDN                 LimeLight
  LiteSpeed                     LiteSpeed Technologies
  Open-Resty Lua Nginx          FLOSS
  Oracle Cloud                  Oracle
  Malcare                       Inactiv
  MaxCDN                        MaxCDN
  ModSecurity                   SpiderLabs
  NAXSI                         NBS Systems
  Nemesida                      PentestIt
  NevisProxy                    AdNovum
  NetContinuum                  Barracuda Networks
  NetScaler AppFirewall         Citrix Systems
  Newdefend                     NewDefend
  NexusGuard Firewall           NexusGuard
  NinjaFirewall                 NinTechNet
  NullDDoS Protection           NullDDoS
  NSFocus                       NSFocus Global Inc.
  OnMessage Shield              BlackBaud
  PerimeterX                    PerimeterX
  PentaWAF                      Global Network Services
  pkSecurity IDS                pkSec
  PowerCDN                      PowerCDN
  Profense                      ArmorLogic
  Puhui                         Puhui
  Qiniu                         Qiniu CDN
  Reblaze                       Reblaze
  RSFirewall                    RSJoomla!
  Sabre Firewall                Sabre
  Safe3 Web Firewall            Safe3
  Safedog                       SafeDog
  Safeline                      Chaitin Tech.
  SecKing                       SecKing
  eEye SecureIIS                BeyondTrust
  SecuPress WP Security         SecuPress
  SecureSphere                  Imperva Inc.
  Secure Entry                  United Security Providers
  SEnginx                       Neusoft    
  ServerDefender VP             Port80 Software
  Shield Security               One Dollar Plugin
  Shadow Daemon                 Zecure  
  SiteGround                    SiteGround 
  SiteGuard                     Sakura Inc.   
  Sitelock                      TrueShield
  SonicWall                     Dell        
  UTM Web Protection            Sophos   
  Squarespace                   Squarespace  
  SquidProxy IDS                SquidProxy
  StackPath                     StackPath
  Sucuri CloudProxy             Sucuri Inc.
  Teros                         Citrix Systems
  Trafficshield                 F5 Networks
  TransIP Web Firewall          TransIP  
  URLScan                       Microsoft
  UEWaf                         UCloud
  Varnish                       OWASP 
  Viettel                       Cloudrity
  VirusDie                      VirusDie LLC
  Wallarm                       Wallarm Inc.
  WatchGuard                    WatchGuard Technologies
  WebARX                        WebARX Security Solutions
  WebKnight                     AQTRONIX
  WebLand                       WebLand
  RayWAF                        WebRay Solutions
  WebSEAL                       IBM
  WebTotem                      WebTotem
  West263 CDN                   West263CDN
  Wordfence                     Defiant 
  WP Cerber Security            Cerber Tech
  WTS-WAF                       WTS      
  360WangZhanBao                360 Technologies
  XLabs Security WAF            XLabs
  Xuanwudun                     Xuanwudun
  Yundun                        Yundun
  Yunsuo                        Yunsuo
  Yunjiasu                      Baidu Cloud Computing
  YXLink                        YxLink Technologies
  Zenedge                       Zenedge
  ZScaler                       Accenture

How do I use it?

First, install the tools as described here.

For help you can make use of the --help option. The basic usage is to pass an URL as an argument. Example:

$  wafw00f https://example.org

                ______
               /      \
              (  W00f! )
               \  ____/
               ,,    __            404 Hack Not Found
           |`-.__   / /                      __     __
           /"  _/  /_/                       \ \   / /
          *===*    /                          \ \_/ /  405 Not Allowed
         /     )__//                           \   /
    /|  /     /---`                        403 Forbidden
    \\/`   \ |                                 / _ \
    `\    /_\\_              502 Bad Gateway  / / \ \  500 Internal Error
      `_____``-`                             /_/   \_\

                        ~ WAFW00F : v2.0.0 ~
        The Web Application Firewall Fingerprinting Toolkit
    
[*] Checking https://example.org
[+] The site https://example.org is behind Edgecast (Verizon Digital Media) WAF.
[~] Number of requests: 2

How do I install it?

The following should do the trick:

python setup.py install

Usage

Arguments List

$ wafw00f -h

                    ______
                   /      \
                  (  Woof! )
                   \______/                      )
                   ,,                           ) (_
              .-. -    _______                 ( |__|
             ()``; |==|_______)                .)|__|
             / ('        /|\                  (  |__|
         (  /  )        / | \                  . |__|
          \(_)_))      /  |  \                   |__|

   WAFW00F - Web Application Firewall Detection Tool (v2.0.0)

Usage: wafw00f url1 [url2 [url3 ... ]]
Example: wafw00f http://www.victim.org/

Options:
  -h, --help            show this help message and exit
  -v, --verbose         Enable verbosity, multiple -v options increase
                        verbosity
  -a, --findall         Find all WAFs which match the signatures, do not stop
                        testing on the first one
  -r, --noredirect      Do not follow redirections given by 3xx responses
  -t TEST, --test=TEST  Test for one specific WAF
  -l, --list            List all WAFs that WAFW00F is able to detect
  -p PROXY, --proxy=PROXY
                        Use an HTTP proxy to perform requests, examples:
                        http://hostname:8080, socks5://hostname:1080,
                        http://user:pass@hostname:8080
  -V, --version         Print out the current version of WafW00f and exit.
  -H HEADERS, --headers=HEADERS
                        Pass custom headers via a text file to overwrite the
                        default header set.

Testing a Single URL

The URL can be directly supplied to the script after WAFW00F has been built and installed on the system.

wafw00f http://example.com

Testing Multiple URLs

Multiple URLs can be supplied one after another using spaces.

wafw00f http://example.com http://host.com http://site.tld

Listing All Supported WAFs

Option: -l or --list

This option lists all the available supported WAF products by WAFW00F. With this option the companies manufacturing the WAF product can also be viewed alongside the WAF name.

wafw00f --list

Adding Custom Headers

Option: -H or --headers

WAFW00F has its own set of default headers by which it makes the requests. The headers are specifically suited for emulating a Chrome browser running on a Windows platform. This option enables you to supply a comma separated list of custom headers which you might want WAFW00F to use during all requests.

wafw00f http://example.com -H headers.txt

NOTE: The headers which you will supply will overwrite the list of default headers.

Using Proxies

Option: -p or --proxy

With this option, you can use proxies to route the requests through. The scheme should be in the normal URL format <scheme>://<username:password>@<hostname>:<port>, where the username and password can be used in cases where the proxy server supports authentication.

wafw00f http://example.com -p http://user:pass@127.0.0.1:8080

Testing For A Single WAF Instance

Option: -t or --test

This option helps you set WAFW00F to test for a single instance of a WAF. When this argument is supplied, WAFW00F will test and try to match the fingerprint for the given WAF only. The supplied WAF name should be equal to at least one of the names within wafprio.py. You can use the --list argument to list the products supported by the WAF.

wafw00f http://example.com -t 'Edgecast (Verizon Digital Media)'

Testing For All Possible WAF Instances

Option: -a or --findall

This option helps set WAFW00F on a run and lets you enumerate all possible instances of a WAF on the site being tested. The logic behind this is that WAFW00F continues testing and matching fingerprints throughout its database and doesn't exclusively stop on the first matched instance.

wafw00f http://example.com -a

Controlling Verbosity

Option: -v ...

This option helps set the verbosity level of the output. You can supply multiple instances of the argument for a better verbose output. More the number of -vs, more verbose is the output.

wafw00f http://example.com -v -v

Version & License

Option: -V or --version

This option displays the current version of WAFW00F from wafw00f/__init__.py which you're using.

wafw00f --version

Final Words

Questions? Pull up an issue on GitHub Issue Tracker or contact me.
Pull requests, ideas and issues are highly welcome. If you wish to see how WAFW00F is being developed, check out the development board.

Some useful links:

Presently being developed and maintained by:


Main page: https://github.com/EnableSecurity/wafw00f

The post WAFW00F - The Web Application Firewall Fingerprinting Tool appeared first on Hakin9 - IT Security Magazine.

x86/x86-64 Assembly Introduction [FREE COURSE CONTENT]

$
0
0

In this video from our Reverse Engineering with Ghidra course we take shot at learning the basics of x86/x86-64 Assembly. This is just the very beginning of our adventure, so we're laying sold foundations to play with Ghidra later on. We'll take a closer look at: 

  • Windows & Linux calling convention
  • Stack organization
  • Function prolog and epilog
  • Segmentation
  • Understanding loops in assembly

If this is something you like to do, definitely check out the whole training!


Whether you dissect malware or any other software, whether your goal is security testing or understanding how everything works, reverse engineering is the most effective method you can use. This course will hone your assembly language skills, go through how arguments get passed in registers, and land on analyzing sophisticated malware. All of this will be done using Ghidra, the free and open-source tool developed by the National Security Agency.

Ghidra is one of the most powerful Reverse Engineering tools available in the market, and the course will not only teach you regular RE techniques, but will also show how to boost them using Ghidra’s advanced capabilities.

This course will introduce you to Ghidra, which is a reverse engineering tool with one of the most advanced decompilers available. After this course it will be your go-to when you want to deconstruct malware. Let’s face it, malware analysis will not go away anytime soon, and malware authors have always been one step ahead of the security researchers. Why not face them armed with the best arsenal?

Every day attackers target things that could affect your everyday life and work, from nuclear power plants to a simple washing machine in your house. As a security pro these are the problems you are facing right now, and it will only get more serious from now on. You need to keep up with malware to defend against it, and reverse engineering it with top-shelf tools is the best way to do it.


The post x86/x86-64 Assembly Introduction [FREE COURSE CONTENT] appeared first on Hakin9 - IT Security Magazine.


8 Free Tools to Automate Your Incident Response Process by Gilad David Maayan

$
0
0

Image Source

Incident response is the organized practice of responding to cyber security events. These processes are typically organized into an incident response plan, which outlines the steps and tools the organizations should follow during events. 

An incident response plan can and should differ between organizations, established to cover the specific needs of the security perimeter. However, the plan should typically cover six key steps—preparation, identification, containment, eradication, recovery, and lessons learned.

Since the incident response process is often circular, there are many repetitive tasks. To save time, you can delegate these tasks to dedicated tools. Read on to learn about the importance of incident response automation, and discover six popular tools.

What Is Incident Response Automation and Why Is It Important?

Incident response is a critical, time-sensitive activity, and in virtually all organizations security analyst time is scarce. It is impossible to manually review and investigate all alerts from modern security tools. 

Automating incident response activities can help reduce the time it takes to mitigate a critical incident, preventing malware from spreading or stopping attackers from doing any more damage. It can also save time by allowing security teams to review more security events, and identify and investigate important potential incidents.

Incident response automation can help you:

  • Quickly triage and identify relevant security incidents
  • Investigate incidents more easily by automatically compiling all relevant data
  • Automate incident response tasks, or even complete response and mitigation processes, using security playbooks

How to Choose the Right Incident Response Tool

When selecting an automated incident response tool, consider what part of the incident response process you need to automate. Some tools help you gather and make sense of data, while others help you automate actual response procedures. Other tools assist with detailed forensic investigations of security incidents. Most free tools provide a solution for only part of the incident response process, so you will need to combine several tools. 

Also consider the skillset of your security team, to ensure you can be productive with the tools without a steep learning curve. A tool like SANS SIFT is very powerful but requires a deep understanding of forensics principles. Simpler tools like Cyphon can help you get up and running quickly and will be suitable for all but the most complex incidents.

A final consideration is deployment and integration—do you need to deploy the tool as a server, or will it run on analyst workstations? Do you need to deploy agents on specific machines? Is there a need to integrate additional security tools? This may affect the cost and complexity of the solution, even if the tool itself is free.

8 Free Tools to Automate Your Incident Response

1. TheHive

TheHive makes it possible to work as a team to investigate security incidents. It is a Security Operations Center (SOC) orchestration system that lets teams collaborate to perform quality, timely searches on security data. Every search corresponds to a scenario, which may be broken down into one or more jobs. These tasks are claimed by security analysts in the SOC, who investigate them simultaneously. TheHive can also integrate with email, Security Information and Event Management (SIEM) systems and other sources via a Python API.

2. AlienVault

AlienVault OSSIM is an open source Security Information and Event Management (SIEM) system that connects to security tools and IT systems in an organization, gathers security-related events and data, and helps security teams make sense of it to identify security incidents. It provides asset discovery, vulnerability assessment, intrusion detection based on event data, behavioral analysis and event correlation rules.

3. GRR Rapid Response

Developed by Google security researchers, GRR is an agent-based cross-platform system that executes data collection tasks like memory evaluation, file and registry research, and device activity observation. The toolset includes job automation features like automatic scheduling for recurring tasks. It provides integrated scripting via an IPython console. GRR can be deployed at large scale across a large number of nodes.

4. Cyphon

Cyphon is an open source tool that enables security analysts to collect data, process it and identify incidents from raw security events. It can process sources like logs, APIs and emails, allowing analysts to decide how much data they want to see to conduct their investigation. It can also generate custom alerts, identify criticality of incidents, and track work performed by security analysts.

5. SANS Investigative Forensics Toolkit (SIFT)

The SANS Investigative Forensic Toolkit (SIFT) is a Ubuntu Live CD. It is composed of a range of tools for running forensic investigations. 

SIFT supports the following formats:

  • Advanced Forensic Format (AFF)
  • RAW (dd) proof 
  • Expert Witness Format (E01)

SIFT provides capabilities like creating a timeline from system logs, file carving to extract specific evidence, and recycle bin analysis. It supports both Linux and Windows. 

6. Volatility

Volatility is a memory forensics platform that allows analysts to create memory dumps of systems affected by security incidents, and analyze their contents. Based on volatile memory data, the tool can analyze network activity, process IDs, process activity, DLLs, kernel memory and objects, registry scans, and more. 

7. CrowdStrike CrowdResponse

CrowdResponse is a lightweight console application that can help you gather contextual information about security incidents, such as directory listing, process lists and scheduled system jobs. It can verify digital signatures of processes running on a system, and use embedded YARA signatures to scan a host for malware and document infections found.

8. Cyber Triage

Cyber Triage is a commercial tool that provides a free plan. It integrates SIEM and Intrusion Detection Systems (IDS) to gather data, identifies security incidents and scores them automatically, and allows security analysts to compare current security incidents to threat intelligence data. 

Conclusion

Hopefully, this article has helped you better understand the importance of automating incident response processes. There are many (paid and free) automation tools, so if you haven’t found the right one for you, keep looking. Security tasks will continue to pile up, and automation can help you maintain continual visibility.


About the Author:

Gilad David Maayan is a technology writer who has worked with over 150 technology companies including SAP, Samsung NEXT, NetApp and Imperva, producing technical and thought leadership content that elucidates technical solutions for developers and IT leadership.


LinkedIn: https://www.linkedin.com/in/giladdavidmaayan/


The post 8 Free Tools to Automate Your Incident Response Process by Gilad David Maayan appeared first on Hakin9 - IT Security Magazine.

Why Blockchain Is a Good Choice for Your Next Project by Dmitry Reshetchenko

$
0
0

Blockchain can drive technology change for a significant number of industries. Data consistency, transparency of the processes, and no means to make updates to the facts that have already happened are the key benefits that make this technology popular. In this article, we'll have a look at the marketplaces and e-commerce niche.

It is good for marketplaces

65% of all online retail purchases are made at four main sites: Amazon, eBay, Alibaba, Etsy. This situation has several reasons, and the main one is the approval of the concept of the "marketplace."

A marketplace is an online platform for the provision of goods and services, where producers and consumers of goods can use ready-made online services. For example, consumers search according to the preferred characteristics of goods among a large number of manufacturers, information on ratings and sales of manufacturers, non-cash payment and payment protection systems.

Benefits for manufacturers are ready-made technological solutions for creating an online store without the expenses for developing a site and mobile applications, and payment infrastructure for interactions with customers.

Thus, the concept of a "marketplace" represents a stage in e-commerce or even banking app development. The software technology and payment infrastructure are separated from sellers and buyers and supported by an independent body - the operator of the technology platform. And it's the bright moment where the blockchain can indeed guarantee full security compliance.

The tendencies towards monopolization in the market of new Internet technologies lead to the need for the trust of all platform participants to its operator. And they lead to the concentration of risks inside the infrastructure of such operators. These factors are especially relevant in the context of the globalization of economies for the development of cross-border online trading where there are no mechanisms to ensure adequate legal protection of the parties.

The use of distributed registry technologies (DLT, blockchain) helps in solving a number of these problems. It also helps to optimize the work of marketplaces, ensuring healthy competition in the e-commerce market, as well as providing services on the Internet that were previously hard to provide online.

How does it look in reality?

Thus, the immutability of transactions in the blockchain ensures the impossibility of modifying or losing data on user transactions by the platform operator. Regardless of the desire of the operator or the critical condition of the infrastructure, the users will always receive up-to-date data on their operations. It can be used to protect their rights and legitimate interests.

The presence of a validated and audited DLT network increases competition in the market of marketplaces, as it causes users a priori confidence in the infrastructure of new market participants.

According to a study conducted by Deloitte in May 2014, reviews and ratings of goods and services are the most popular information pieces for buyers (according to Deloitte, 81% of potential buyers study them). The use of blockchain technologies makes it impossible to remove this information from marketplaces providing users with objective and transparent information about products and manufacturers.

DLT technologies allow us the use of tokenization tools and smart contracts on marketplaces. Smart contracts can be used as a very cheap means of automating settlements in the online trading process.

This is especially true for cross-border operations: a smart contract provides settlements on predetermined milestones (for example, receipt of goods by a buyer, automatic calculation of penalties for late payments). It can also serve as a mechanism for resolving disputes and rating participants in operations.

What can tokens provide for you?

The tokenization mechanism can be used both for the ability to pay for goods with the help of cryptocurrencies and for reflecting the cost of mutual transactions. It's also used for the netting procedure to reduce transaction costs and the ability to make payments only within the balance of operations for a specific period.

At the same time, to ensure the security of settlements, both cryptocurrency and fiat currencies can be reserved (for example, on escrow accounts or other specialized accounts of a custodian bank). The latter is especially true since small and medium-sized businesses are not able to clean up the cost of the services of financial organizations to ensure cross-border payments (letters of credit, bank guarantees). 

A new type of payment, such as a "digital letter of credit", requires high costs for the technological connection of the transaction participant to payment infrastructure representing the services of financial institutions. In this sense, these costs can be incurred once by the platform operator when using the marketplace.

Summary

As already mentioned, DLT-technology is not only able to transfer online services that we were not previously familiar with but also give a start to new sectors of the economy.

For example, the Ukrainian startup (the Propy blockchain platform) offers users to rent and buy real estate online using smart contracts, and Singapore-based Power Group launched a marketplace for trading certificates for the use of renewable energy sources.


About the Author:

Dmitry Reshetchenko is an Outreach Specialist for Diceus, a technology partner for developing enterprise solutions. He is passionate in his belief that a partnership with IT blogs is of great importance. Dmitry works mostly with Tech blogs.


The post Why Blockchain Is a Good Choice for Your Next Project by Dmitry Reshetchenko appeared first on Hakin9 - IT Security Magazine.

IotShark - Monitoring And Analyzing IoT Traffic

$
0
0

IoTShark aims to provide a [nearly] fully automated solution for a user to monitor their IOT devices by simply running a single script. The user merely has to select which device they wish to monitor, and this program takes care of the rest of the heavy work by starting the ARP poisoning, setting up the packet forwarding and the man in the middle packet sniffer. It also has an easy to understand and interactive web UI where a user can filter the packets based on the ports, types, and timestamps to get a broader understanding of how much and when things are being transmitted.

We also aim to classify certain kinds of data such as heartbeat messages, data transfers, and anomalies, though the last one will likely be demonstrated on the un-encrypted RPi test since it is difficult to do anomaly detection without huge amounts of data (and we would require many devices and individuals to gather that much data).

How to run:

  1. Install the required libraries: $pip3 -r requirements.txt
  2. Set up the ip forwarding: $sudo sysctl net.inet.ip.forwarding=1
  3. Run the app: sudo python3 mitm_main.py

The Main Script

Create a Python virtual envionment and install dependency packages.

virtualenv --python=`which python3` venv
source venv/bin/activate
python -r requirements.txt

Make sure packet forwarding is enabled on your local machine. This is necessary for man-in-the-middle attack to work. On macOS this can be done with:

sudo sysctl net.inet.ip.forwarding=1

Run the main program mitm_main.py. See that script for accepted options.

Currently this program does three things:

  1. Scan for all hosts either in the given subnet by the -s option or a set of common residential subnets
  2. Discover the hardware vendor and OS of each host
  3. Perform ARP poisoning between the selected host and gateway router
  4. Output graphs of past captured data by the -f option followed by relative path to csv file

After ARP poisoning is running, you can examine traffic from the target device by Wireshark with a display filter like:

(ip.src==192.168.0.215 or ip.dst==192.168.0.215) and tcp.port != 443

Data File Format

The captured data is stored in a csv file with the following format:

{timestamp, incoming_bytes, outgoing_bytes, srcport, dstport, transfer_protocol, connection_protocol, srcip, dstip}

123123213, 0, 240, 36, 80, 65124, HTTP, UDP, 192.168.0.215, 104.24.4.5
123123240, 300, 0, 800, 443, 65125, HTTPS, TCP, 104.24.4.5, 192.168.0.215

Using the Tool to Sniff IoT Devices

For example, here is a long string that we can say to Alexa Echo Dot/Google Home while sniffing their traffic. Pay attention if the device is transmitting data before the wake word.

It is a dark and stormy night. My friends and I just came back from the Yosemite National Park, where the quick brown fox jumps over the lazy dog. Next week is Thanksgiving. Black Friday in 2019 is coming as well. It's a good time to do something exciting, such as taking a Computer Security class or a Programming Language class at UCLA. By the way, the first Airbus A380 jumbo jet is retiring. We like flying in that plane.

WAKE_WORD, what is the weather like in Los Angeles on Thanksgiving?

Anyways, we have Boeing 787 Dreamliners for cross-continental flights. The Web and Mobile System class with Ravi is amazing. We should upgrade the commercial laundry machine during the Black Friday sale. The bright and sunny weather is coming back and a trip to Joshua Tree National Park awaits. Well, I just saw a slow cat crashed into a new Android robot. There are some other robots made by Apple and Amazon too.

More at: https://github.com/sahilmgandhi/IotShark

The post IotShark - Monitoring And Analyzing IoT Traffic appeared first on Hakin9 - IT Security Magazine.

Attack surfaces, tools and techniques cheat sheet | by SANS

Is it still safe to use the internet in 2020? by Florian Pauly

$
0
0

When the World Wide Web became available for public use Tim Berners-Lee had no idea of the impact it would have on the world. Today, more than 4.39 billion people use the internet and that number rises every day. While the internet brought a lot of good, some people have exploited it. We are talking about hackers and cyber-criminals. This brings about the question is it still safe to use the internet going into 2020?

What you have to worry about

The first-ever computer worm to gain mass media attention arrived during 1988 and worms continually evolve. Today viruses and malware have become a pandemic for which there seems to be no permanent cure. Cyber-attacks are evolving constantly and happen on an almost daily basis. Today attacks occur in all sizes and shapes involving individuals to large companies, worldwide. From individuals having their identity and lives stolen to customer accounts being breached and huge amounts of money stolen, hacking can happen to anyone. Never has there been more need to remain secure online. While hackers and cyber-criminals use technology that advances with each passing year, so does security measures.

Steps you can take to remain secure

Here we are going to look at some of the steps you can take to ensure you remain secure online. They range from steps that are simple, but which are easily overlooked and forgotten, to the more complex and secure measures.

1 Choose complex passwords

Let’s start with passwords. User accounts from your online banking app or website to social media websites all rely on passwords. 

Complex passwords are easy to forget and may leave you locked out of your account. However, if you choose passwords that are easy for you to remember, they are also easy for hackers and cyber-criminals to guess. 

It can be surprising how many people use their date of birth, house number, postcode or something relatable as passwords. 

Hackers can find out your date of birth, often through social media, they can use the same methods to discover your house number. Once they have your password they can breach your accounts to discover more information about you or take over your identity.

Therefore, it pays to use complex passwords with a combination of letters, numbers and special characters. If you have trouble remembering passwords, use a password manager. 

2 Use 2-factor authentication

Along with choosing complex passwords, you should also take advantage of 2-factor authentication offered.

Today many sites and accounts that you sign up to allow you to turn on 2-factor authentication. With this turned on even if someone manages to break your password they still cannot enter your account without a special code. 

This code is generally sent to your mobile phone and is generated on the fly each time you access your account. 

3 Use a VPN

By far the best way to protect yourself online is to take out a plan with a VPN provider. 

When using a VPN you can connect to a server from any of the ones around the world supported. When connected to a server your own IP address is masked and you get one from the server. 

This means no one can find out any information from your IP address and no one knows where you are actually located. 

The connection to the server also provides you with military-grade encryption. With encryption, no one can see what you are doing online. Hackers cannot read passwords or information you type and even your own ISP has no idea what websites you visit or what you download.

In essence, a VPN covers your tracks online. Some providers offer additional benefits to ward off malware and stop websites from tracking you, which helps you to remain safe on the internet. 

4 Make sure your firewall and virus software is up to date

It goes without saying; you should use virus and malware software on your device. 

However, it does need to be updated constantly to counteract the latest viruses and malware. Many free to use software does not update on its own. So with this in mind always check to ensure yours is up to date.

Preferably, choose software that resides in the background of your computer running constantly while you browse. This way it detects threats as you browse and acts immediately. You might have to pay for this but in the long-term it can pay for itself. 

5 Don’t click on links you don’t recognise

Finally, viruses and malware may be spread to your computer or device by clicking on links sent to your email account.

Malware can be embedded in the links so that when you click on it a small piece of software self-installs and keeps track of everything you do, including your passwords and usernames. 

Another way hackers use email is to send emails that look as though they have come from your bank account or PayPal. The email often states your account is compromised and you need to click the link to change your password. 

In fact, the link is bogus, although very convincing. When you click the link, the hacker gets your account details and can sign in and steal from you.

In Summary

The internet is still a great place despite some individuals and groups being determined to make it otherwise.

With a little fortitude on your part, it is still safe to use the internet. By using a combination of any or all of the above security measures, you can remain safe and secure online.


About the Author:

Florian is a tech-savvy expert, dedicated to educate people on Online Security. He’s the founder of The-BestVPN.com, a website that aims at testing and comparing the different VPN providers. 

The post Is it still safe to use the internet in 2020? by Florian Pauly appeared first on Hakin9 - IT Security Magazine.

So, you want to try this 'hacking'​ stuff… | by Garry R

$
0
0

So, you want to try this 'hacking'​ stuff… 

I've been presenting a lot lately. It's always nice to educate and surprise people by showing them something they have never seen before. From brute-forcing passwords to exploiting vulnerable software to get access to a computer. When the time comes for Q&A, I almost always get asked by someone:

"How can I learn how to hack?"

The short and sweet answer is: "Google it." However, this will almost certainly lead most people down a rabbit hole. So, to fix that, I've created a 10 step plan for anyone keen to learn how to hack. Enjoy.

1. Get a computer

It doesn't have to be expensive, but should have enough RAM to run virtual machines. I use a MacBook Pro with 32Gb of RAM, but if you don't know what you need, you can search DuckDuckGo for "laptop for hacking".

2. Get a hypervisor

A hypervisor is a piece of software that enables you to run a computer within a computer (also known as a virtual machine or VM). I use VMware Fusion because I'm on macOS, but you can use use VirtualBox if you prefer. If you're on Windows you can use VMware Workstation.

3. Download Kali Linux

Kali is free, actively maintained, and a great starting point. Make sure you get the version that works on your hypervisor. If you're stuck on the setup process, search for it on YouTube.

4. Setup Kali

Get Kali working nicely on your hypervisor and test your internet connection. Again, if you have difficulty with the connection, just Google it. Pay attention to the network settings in your hypervisor software (look out for words like: bridged, NAT, auto-detect). All the Kali documentation is here.

5. Gain knowledge

All you lack now, is knowledge. At this stage of the game, you have all of the basic equipment that I, and many others, use on a daily basis. There are a plethora of websites, YouTube channels, and books to choose from. Get ready to be busy organising your bookmarks. I recommend GitBook for staying organised.

6. Get a hold of these books

  • Kali Linux Revealed (free, from Offensive Security here). This book will teach you how Kali works. Can you imagine if Lewis Hamilton didn't know how his F1 car worked? You don't need to memorise the information in this book, just read over it and remember it is always there if you need it.
  • Penetration Testing by Georgia Weidman (paid, available here). This book is possibly the best all-rounder when it comes to learning to hack. You will cover setting up your own lab, attacking computers, breaking passwords, and all that exciting stuff. It's a lot to take in, but go with it as best you can.

7. Setup Metasploitable

Metasploitable is an intentionally vulnerable VM made by a company called Rapid7. You set it up alongside the Kali VM and then attack it. There are plenty of videos on YouTube to show you how to achieve both. You can get a hold of it here and there is an official guide on that page too.

8. Explore VulnHub

If you have exhausted Metasploitable, you'll have certainly learnt a lot, but it's time to step it up. VulnHub is a website that hosts vulnerable computers, just like Metasploitable. They have tutorials that teach you how to hack each of them. This is where it all gets a bit slow, because you have to download the entire image file and set it up in your hypervisor. Have a go anyway and we'll fix the slowness in a minute.

9. Join Hack the Box

This is it: the big one! Hack the Box is the top dog when it comes to online training labs. This puts an end to downloading VMs from VulnHub and troubleshooting your setup.

To even join Hack the Box, you'll have to hack your way in. Once you're in, I highly recommend buying the VIP access; it's a bargain at twice the price. You'll get access to active and retired machines, challenges, a members area, and there are "pro" labs when you're ready to really test your skills. The retired machines are where you will do the vast majority of your learning, with great videos from IppSec. You can even apply for jobs directly on the site whenever you have earned the relevant rank to do so. There's a strong community on the platform and don't need to download anything other than a VPN configuration file. This is not a paid endorsement.

10. Test what you have learned

If you've gone through all that, you've come a long way. Well done. Perhaps you'd like to consolidate what you know in a common format that employers will understand: a certification. There are a lot of information security training courses and exams out there. Here's a few vendors and courses to check out:

  • eLearn Security: eJPT ($ - a fun and cost effective way to get your first certificate).
  • Offensive Security: OSCP and OSCE ($$ - both are 48 hours of pain, the most coveted certificates on the market).
  • Spectre Ops: Red and Blue team training ($$$ - these people invented some of the best attack tools on the market).
  • SANS: They teach almost everything ($$$$ - not cheap, but very well regarded in the industry).


That's it.

If you've read all of this, thank you, and I hope I've helped give you some direction on how to get started with this "hacking stuff". If you have further questions, don't hesitate to reach out.

Originally posed: https://www.linkedin.com/pulse/so-you-want-try-hacking-stuff-gary-r/

The post So, you want to try this 'hacking'​ stuff… | by Garry R appeared first on Hakin9 - IT Security Magazine.

DroneSploit - A pentesting console framework dedicated to drones

$
0
0

This CLI framework is based on sploitkit and is an attempt to gather hacking techniques and exploits especially focused on drone hacking. For the ease of use, the interface has a layout that looks like Metasploit.

DroneSploit was created by Alexandre D’Hondt and Yannick Pasquazzo. The project is still in the development stage, as both developers are working to improve its capabilities. For now, DroneSploit is designed to target only WiFi-controlled drones and includes a set of modules (based on Aircrack-NG) that allows users to hack into poorly configured ones. DroneSploit currently supports modules for the C-me and Flitt drones (Hobbico). New modules for other brands and models (including Parrot and DJI) are in development and due to be added shortly.

The project was presented at Black Hat Europe Arsenal 2019, and you can download the presentation from here.

Setup

This project is available on PyPi and can be simply installed using Pip:

pip3 install dronesploit

1. Startup

$ python3 main.py --help
usage: ./main.py [--dev] [-h] [-v]

Main

optional arguments:
  --dev          development mode (default: False)

extra arguments:
  -h, --help     show this help message and exit
  -v, --verbose  verbose mode (default: False)

The console is started using the launcher main.py. It may ask for sudo rights as it must have the permission for setting WiFi interfaces.

$ python3 main.py
[sudo] password for user:

[...]

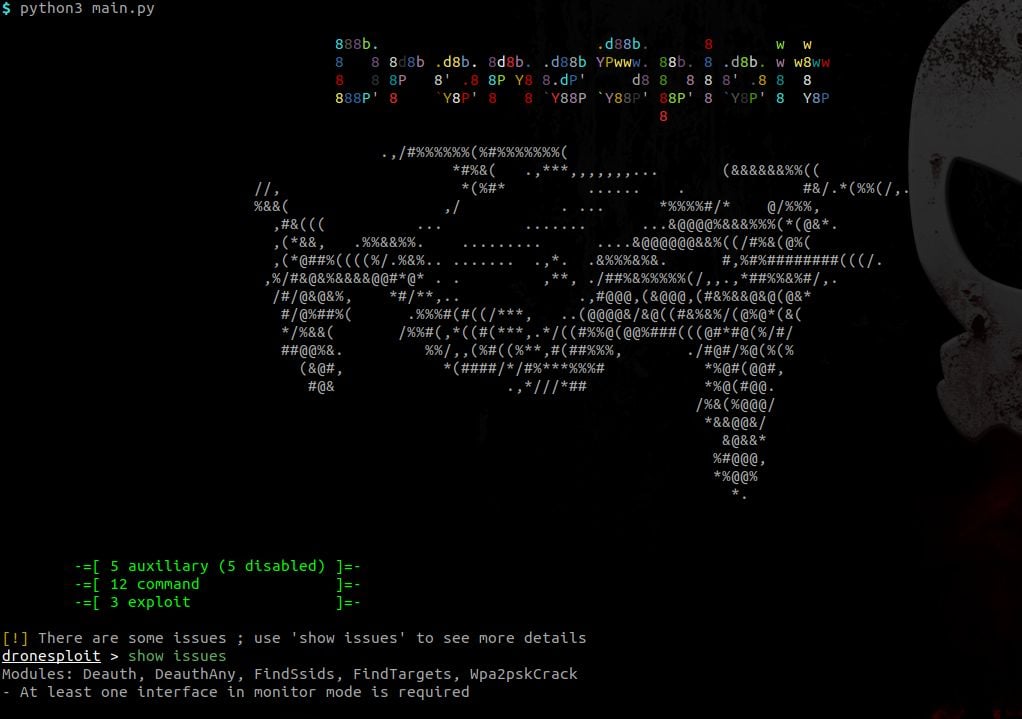
At startup, a banner is shown and a summary of the available modules is shown.

Some requirements can be unsatisfied at startup like in the picture above. The command show issues allows to identify how this can be fixed.

2.1 From the root console

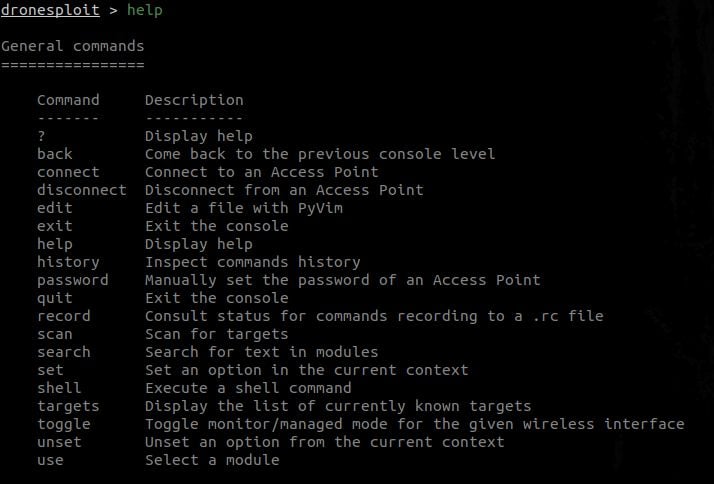
dronesploit > help
[...]

This will display multiple sections in function of the context ;

  • General commands are always displayed. Example: Getting help in DroneSploit - General commands

  • Level-specific commands are displayed according to the current console. Example: Getting help in DroneSploit - Specific commands:

2.2 From the project console

dronesploit > select test
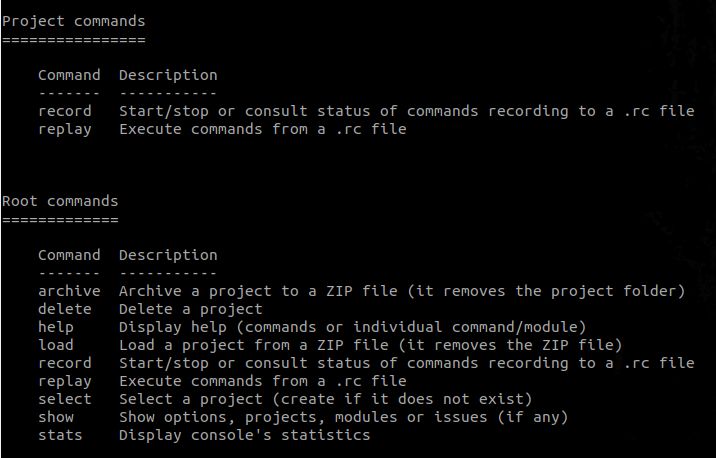
dronesploit[test] > help
[...]

Now being into the context of a project, we now see the general commands again but with the project commands as the section for level-specific commands; Example: Getting help in DroneSploit - Project-level commands:

2.3 From the module console

dronesploit[test] > use auxiliary/wifi/deauth
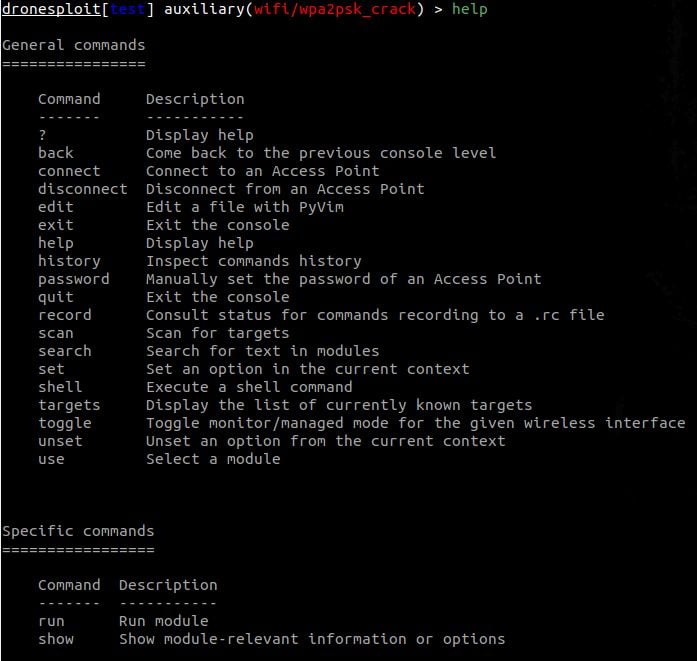
dronesploit[test] auxiliary(wifi/deauth) > help
[...]

Now being into the context of a module, we now see the general commands again but with the module commands as the section for level-specific commands; Example: Getting help in DroneSploit - Module-level commands:

3. Listing available modules

This can be achieved by executing the following command:

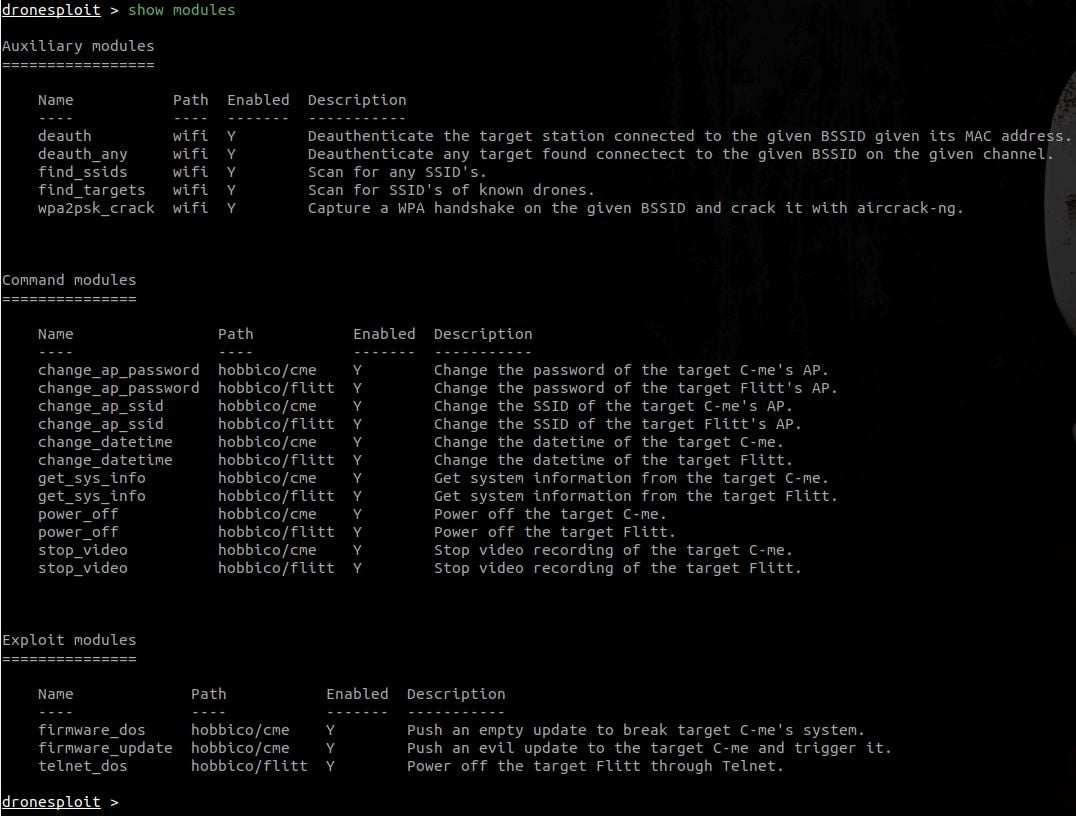
In the screenshot above, one can see two modules that are disabled, like shown at startup.

4. Enabling the WiFi monitor mode

The toggle command allows to toggle the WiFi mode for an interface. It autocompletes through the list of WiFi interfaces present on the system.

When executed, it switches between the managed and monitor modes

5. Scanning for targets

The scan command allows to quickly scan for targets (and requires a WiFi interface in monitor mode).

The targets command then allows to list the discovered targets and their characteristics.

Targets are valid during a period of 5 minutes, meaning that they will still be displayed after this period, but when using the scan command again, the list will be updated (and targets that are not in the vicinity anymore will disappear).

6. Breaking into a target

Now that we have a target, we can start an attack. For this purpose, we start the appropriate attack module. Note that, in the example hereafter, the ESSID and INTERFACE options are automatically filled in with the current information.

The attack succeeded and the password is then known in the targets list.

Sadly, lots of light commercial drones have the same default password ; the password command allows to fill in the password without having to run an attack.

7. Connecting to the target

At this point, we have a password for a target, we can know connect to it using the connectcommand.

Like shown in the screenshot above, the targets list has now a row highlighted in bold to show that we are connected to this target.

We can also connect to another target.

In the case herebefore, we call a module for which the required model of target can not be found as connected to the attack machine, therefore raising a warning. If we show the options for this module, we get several required values that are not filled in.

8. Executing a module

We can now use a module for the connected drone using the use command.

In this example, one can see that the value for the TARGET option is automatically filled in. The module is then directly ready to run.

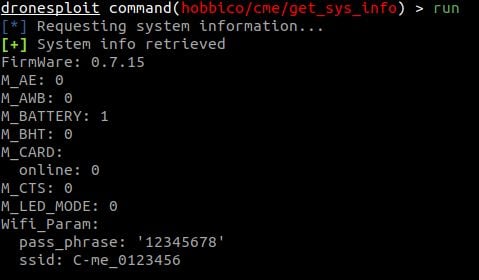
Finally, we can run the module by using the run command.


Problems? Check the main page: https://github.com/dhondta/dronesploit

The post DroneSploit - A pentesting console framework dedicated to drones appeared first on Hakin9 - IT Security Magazine.


SQL commands Cheat Sheet by Cheatography

Aaia - AWS Identity and Access Management Visualizer and Anomaly Finder

$
0
0

What does Aaia do?

Aaia (pronounced as shown here) helps in visualizing AWS IAM and organizations in a graph format with help of Neo4j. This helps in identifying the outliers easily. Since it is based on neo4j , one can query the graph using cypher queries to find the anomalies.

Aaia also supports modules to programatically fetch data from neo4j database and process it in a custom fashion. This is mostly useful if any complex comparision or logic has to be applied which otherwise would not be easy through cypher queries.

Aaia was initially intended to be a tool to enumerate privelege esclation possibilities and find loop holes in AWS IAM. It was inspired from the quote by @JohnLaTwC

"Defenders think in lists. Attackers think in graphs. As long as this is true, attackers win."

Why the name "Aaia"?

Aaia in Tamil means grandma. In general, Aaia knows everything about the family. She can easily connect who is related to whom and how and give you the connection within a split second. She is a living graph database!

Since "Aaia" also does more or less the same, hence the name.

Installation

Install the neo4j Database

Instructions here

Setup the username, password and bolt connection uri in Aaia.conf file. An example format is given in Aaia.conf file already.

Install OS dependency

Debian :

apt-get install awscli jq

Redhat / Fedora / Centos / Amazon Linux :

yum install awscli jq

Note:

These packages are needed for Aaia_aws_collector.sh script. Ensure these packages are present in the base system from where the collector script is being run.

Clone this repository

git clone https://github.com/rams3sh/Aaia

cd Aaia/

Create a virtual environment

python3 -m venv env

Activate the virtual environment

source env/bin/activate

Note: Aaia depends on pyjq library which is not stable in windows currently. Hence Aaia is not supported for Windows OS.

Install the dependencies

python -m pip install -r requirements.txt

Using Aaia

Setting up Permissions in AWS

Aaia would require following AWS permissions for collector script to collect relevant data from AWS

iam:GenerateCredentialReport
iam:GetCredentialReport
iam:GetAccountAuthorizationDetails
iam:ListUsers
iam:GetUser
iam:ListGroups
iam:ListRoles
iam:GetRole
iam:GetPolicy
iam:GetAccountPasswordPolicy
iam:GetAccountSummary
iam:ListAccountAliases
organizations:ListAccountsForParent
organizations:ListOrganizationalUnitsForParent
organizations:DescribeOrganization
organizations:ListRoots
organizations:ListAccounts
organizations:ListTagsForResource
organizations:ListPolicies
organizations:ListTargetsForPolicy
organizations:DescribePolicy
organizations:ListAWSServiceAccessForOrganization

"Organizations" related permissions can be ommitted. However , all the above mentioned "IAM" related permissions are necessary.

Ensure the permissions are available to the user / role / any aws principal which will be used for collection of data for the collector script.

Collecting data from AWS

Ensure you have aws credentials configured. Refer this for help.

Once the crendential is setup.

Run:

./Aaia_aws_collector.sh

Ensure the output format of the aws profile being used for data collection is set to json as Aaia expects the data collected to be in json format.

Note:

In case of a requirement where data has to be collected from another instance; copy "Aaia_aws_collector.sh" file to the remote instance , run it and copy the generated "offline_data" folder to the Aaia path in the instance where Aaia is setup and carry on with following steps. This will be helpful in cases of consulting or client audit.

Loading the collected data to Neo4j DB

python Aaia.py -n  -a load_data

-n supports "all" as value which means load all data collected and present within offline_data folder.

Note:

Please ensure you do not have profile as "all" in the credentials file as it may conflict with the argument. :P

Now we are ready to use Aaia.

Audit IAM through a custom module

As of now , a sample module is given as a skeleton example. One can consider this as a reference for building custom modules.

python Aaia.py -n all -m iam_sample_audit

Thanks to

Aaia is influenced and inspired from various amazing open source projects. Huge Shoutout to:

Aaia in Action

Screenshots

A sample visual of a dummy AWS Account's IAM:

A sample visual of a result of a cypher query to find all relations of a user in AWS IAM:

TO DO

  • Write a detailed documentation for understanding Aaia's Neo4j DB Schema
  • Write a detailed documentation for developing custom modules for Aaia
  • Write custom modules to evaluate 28 AWS privelege escalation methods identified by RhinoSecurity.
  • Provide a cheatsheet of queries for identifying simple issues in AWS IAM
  • Extend Aaia to other cloud providers.

More at: https://github.com/rams3sh/Aaia

The post Aaia - AWS Identity and Access Management Visualizer and Anomaly Finder appeared first on Hakin9 - IT Security Magazine.

TorBot - Open Source Intelligence Tool for the Dark Web

$
0
0

TorBot is an open source intelligence tool developed in python. The main objective of this project is to collect open data from the deep web (aka dark web) and with the help of data mining algorithms, collect as much information as possible and produce an interactive tree graph. The interactive tree graph module will be able to display the relations of the collected intelligence data.

Working Procedure/Basic Plan

The basic procedure executed by the web crawling algorithm takes a list of seed URLs as its input and repeatedly executes the following steps:

URLs = input(url)
while(URLs is not empty) do
    dequeue url
    request page
    parse for Links
    for(link in Links) do 
        if (link islive && link is not visited) then 
            add link to URLs
    store page content

Features

  1. Onion Crawler (.onion).(Completed)
  2. Returns Page title and address with a short description about the site.(Partially Completed)
  3. Save links to database.(PR to be reviewed)
  4. Get emails from site.(Completed)
  5. Save crawl info to JSON file.(Completed)
  6. Crawl custom domains.(Completed)
  7. Check if the link is live.(Completed)
  8. Built-in Updater.(Completed)
  9. TorBot GUI(see branch front_end)
  10. Social Media integration.(not Started) ...(will be updated)

Contribute

Contributions to this project are always welcome. To add a new feature fork the dev branch and give a pull request when your new feature is tested and complete. If its a new module, it should be put inside the modules directory. The branch name should be your new feature name in the format <Feature_featurename_version(optional)>. For example, Feature_FasterCrawl_1.0. Contributor name will be updated to the below list. 😀
NOTE : The PR should be made only to dev branch of TorBot.

OS Dependencies

  • Tor
  • Python 3.x
  • Golang 1.x (Not Currently Used)

Python Dependencies

  • beautifulsoup4
  • pyinstaller
  • PySocks
  • termcolor
  • requests
  • requests_mock
  • yattag

Basic setup

Before you run the torBot make sure the following things are done properly:

  • Run tor service sudo service tor start
  • Make sure that your torrc is configured to SOCKS_PORT localhost:9050
  • Install TorBot Python requirements pip3 install -r requirements.txt

On Linux platforms, you can make an executable for TorBot by using the install.sh script. You will need to give the script the correct permissions using chmod +x install.sh Now you can run ./install.sh to create the torBot binary. Run ./torBot to execute the program.

An alternative way of running torBot is shown below, along with help instructions.

python3 torBot.py or use the -h/--help argument

usage: torBot.py [-h] [-v] [--update] [-q] [-u URL] [-s] [-m] [-e EXTENSION]
                 [-l] [-i]

optional arguments:
  -h, --help            Show this help message and exit
  -v, --version         Show current version of TorBot.
  --update              Update TorBot to the latest stable version
  -q, --quiet           Prevent header from displaying
  -u URL, --url URL     Specifiy a website link to crawl, currently returns links on that page
  -s, --save            Save results to a file in json format
  -m, --mail            Get e-mail addresses from the crawled sites
  -e EXTENSION, --extension EXTENSION
                        Specifiy additional website extensions to the
                        list(.com or .org etc)
  -l, --live            Check if websites are live or not (slow)
  -i, --info            Info displays basic info of the scanned site (very
  • NOTE: All flags under -u URL, --url URL must also be passed a -u flag.

Read more about torrc here : Torrc

Using Docker

  • Ensure than you have a tor container running on port 9050.
  • Build the image using following command:docker build -t dedsecinside/torbot .
  • Run the container (make sure to link the tor container as tor):

    docker run --link tor:tor --rm -ti dedsecinside/torbot

TO-DO

  • Visualization Module
  • Implement BFS Search for webcrawler
  • Multithreading for Get Links
  • Improve stability (Handle errors gracefully, expand test coverage and etc.)
  • Create a user-friendly GUI
  • Randomize Tor Connection (Random Header and Identity)
  • Keyword/Phrase search
  • Social Media Integration
  • Increase anonymity and efficiency

Have ideas?

If you have new ideas which is worth implementing, mention those by starting a new issue with the title [FEATURE_REQUEST]. If the idea is worth implementing, congratz, you are now a contributor.


Main page: https://github.com/DedSecInside/TorBot

The post TorBot - Open Source Intelligence Tool for the Dark Web appeared first on Hakin9 - IT Security Magazine.

Passer - Passive service locator, a python sniffer that identifies servers, clients, names and more

$
0
0

Passer can work off a live packet capture or from a pcap file (command line parameter, see examples below). It reports live services and clients, ethernet cards on the lan, dns entries, operating systems, and routers - all passively!

If you're using windows or your paths to the support files don't match mine for some other reason, let me know where they are and I'll be glad to update the script.

Quick notes for getting going with passer, the passive service sniffer. You're responsible for getting permission to sniff.

Installation

Requirements

  • Python >=2.4 and <3.0
  • Python libraries (see requirements.txt)
    • ipaddress
    • pytz
    • scapy>=2.4.0

Optional (but recommended)

  • nmap
    • for Ethernet manufacturers and service strings
  • ettercap, wireshark, and/or arp-scan
    • for more Ethernet manufacturers
  • p0f version 2
    • for the OS fingerprint file

Ubuntu/Debian and deb-based distros

# Install system dependencies
sudo apt-get install arp-scan ettercap-text-only nmap wireshark 
# Install python dependencies
sudo pip install -r requirements.txt
# Prevent Scapy from performing DNS lookups
echo 'noenum = [ Resolve(), TCP_SERVICES, UDP_SERVICES ]' >> ~/.scapy_startup.py

Redhat/CentOS/Fedora and rpm-based distros

# Install system dependencies
sudo yum install arp-scan ettercap nmap wireshark
# Install python dependencies
sudo pip install -r requirements.txt
# Prevent Scapy from performing DNS lookups
echo 'noenum = [ Resolve(), TCP_SERVICES, UDP_SERVICES ]' >> ~/.scapy_startup.py

Docker

You may also use passer within docker. Building is optional as you can also jump straight to the docker run command or the examples which will pull a pre-build docker image from a public repository. You can build the passer image like this:

docker build -t quay.io/activecm/passer .

And then you can run it like this:

docker run --rm -i --init --name=passer --net=host quay.io/activecm/passer

In order to kill passer you can run:

docker stop passer

or press Ctrl-\ (control then backslash) in passer's window.

Examples

Both native and docker equivalent commands are given for each of the following examples. For the docker commands, please use the following bash function which is a wrapper around the docker command with the the additional ability to parse volume mount arguments:

# "c" for "containerized"
function cpasser() {  
  local docker_args=("--rm" "--interactive" "--init" "--name" "passer" "--net" "host")
  local passer_args=()
  while [[ $# -gt 0 ]]; do
    case $1 in
      -v|--volume)
        # pop next two arguments off and append to docker args
        docker_args+=("$1"); shift
        docker_args+=("$1"); shift
        ;;
      -v=*|--volume=*)
        # pop next argument off and append to docker args
        docker_args+=("$1"); shift
        ;;
      *)
        # pop next argument off and append to passer args
        passer_args+=("$1"); shift
        ;;
    esac
  done
  docker run "${docker_args[@]}" quay.io/activecm/passer "${passer_args[@]}"
}
  1. Sniff live as root
/path/to/passer.py
# or with docker
cpasser

This sniffs from all network interfaces and sends all output lines to your console.

  1. Sniff live as a non-root user
sudo /path/to/passer.py

or

su - -c '/path/to/passer.py'
  1. Sniff live as root, but only from one interface
/path/to/passer.py -i IfaceName
# or with docker
cpasser -I IfaceName

Running route should give some live interfaces you might use. This is incompatible with "-r".

  1. Read packets from a pcap file; no root privileges needed
/path/to/passer.py -r /path/to/packets.pcap
# or with docker
cpasser -v /path/to/packets.pcap:/packets.pcap -r /packets.pcap

This is incompatible with "-i".

  1. Accept raw pcap data on stdin
cat packetdata.pcap | ./passer.py -r /proc/self/fd/0
zcat packetdata.pcap.gz | ./passer.py -r /proc/self/fd/0
bzcat packetdata.pcap.bz2 | ./passer.py -r /proc/self/fd/0
tcpdump -i eth0 -qtnp -w - | ./passer.py -r /proc/self/fd/0
# or with docker
cat packetdata.pcap | cpasser -r /proc/self/fd/0
# etc...

This lets you capture packets with any tool that can save packets to a pcap file, and later process them with passer on a different system.

  1. Save output lines to a text file for later processing
/path/to/passer.py -l /path/to/networkinfo.txt
# or with docker
touch /path/to/networkinfo.txt
cpasser -v /path/to/networkinfo.txt.pcap:/networkinfo.txt -l /networkinfo.txt
  1. Suppress warnings and other debugging info
/path/to/passer.py 2>/dev/null
# or with docker
cpasser 2>/dev/null
  1. Show help screen
/path/to/passer.py -h
# or with docker
cpasser -h
  1. Save "odd"/unhandled packets to a pcap file
/path/to/passer.py -u /path/to/oddpackets.pcap
# or with docker
touch /path/to/oddpackets.pcap
cpasser -v /path/to/oddpackets.pcap:/oddpackets.pcap -u /oddpackets.pcap

This is generally intended for the development process; packets saved to this file are ones that need to have signatures written. If you'd like to help improve the program, get in touch with the author, Bill Stearns (william.l.stearns@gmail.com). Contributions of odd packets, descriptions of services, and patches to the program are gratefully accepted.

  1. Apply a BPF filter to limit which packets are processed This should be as simple as placing the BPF filter in single quotes at the end of the command line. As of version 1.16, the underlying library does not appear to successfully use the supplied filter, but there's a workaround. Use tcpdump to do the filtering, and hand the pared-down set of packets to passer on stdin, like above:
tcpdump -r packets.pcap -w - 'icmp or arp' | ./passer.py -r /proc/self/fd/0
# or with docker
tcpdump -r packets.pcap -w - 'icmp or arp' | cpasser -r /proc/self/fd/0

See the "Sample filters" section, below, for some suggestions of filters to use in either capturing packets in advance or live sniffing.

Troubleshooting

socket.error: (1, 'Operation not permitted')

You're probably trying to sniff live as a non-root user. Either log in as root, use sudo/su, or work with pcap files.

If passer crashes or won't work on your system, send me an email (Bill Stearns, william.l.stearns@gmail.com). It would be very helpful if you could include the error message, if any, and any details about your operating system.

Output format

Passer's output goes to stdout, and if you give the command line parameter -l /path/to/logfile, to that file as well. Here's the format:

Type IPAddr Proto State Optional description (may be empty)
'IP' IPaddr 'IP' dead or live p0f OS description
'MA' IPaddr 'Ethernet' MacAddr ManufDescription
'TC' IPaddr 'TCP_'Port closed or open client description
'TS' IPaddr 'TCP_'Port closed or listening server description
'UC' IPaddr 'UDP_'Port open or closed udp client port description
'US' IPaddr 'UDP_'Port open or closed udp server port description
'DN' IPaddr 'A' or 'PTR' hostname possible extra info
'RO' IPaddr 'TTLEx' router possible extra info
  • Column 1: A 2 letter code for the record type
  • Column 2: The IP address being characterized.
  • Column 3: The protocol involved, or "how do we know this?"
  • Column 4: the state of the object being described
  • Column 5: additional information about the object

Lines are comma separated for easy loading into a spreadsheet or SQL import. None of the fields should contain commas. There is a sample output file at http://www.stearns.org/passer/passer-sample-log.txt .

Here are some examples of how to get the data you want out of these lines:

  1. Remove duplicate lines:
cat /var/tmp/passer-log | sort -u | less
  1. Remove duplicate lines and group all records for a given IP together:
cat /var/tmp/passer-log | sort -t, -k2 -u | less
  1. Grab just the DNS and Router records:
cat /var/tmp/passer-log | sort -u | egrep '(^DN|^RO)' | less
  1. See all records for a particular IP address:
cat /var/tmp/passer-log | sort -u | grep ',192\.168\.0\.17,' | less
  1. See all records for a particular network:
cat /var/tmp/passer-log | sort -u | grep ',192\.168\.' | less
  1. See all machines that are listing on TCP port 25 (smtp servers):
cat /var/tmp/passer-log | sort -u | grep ',TCP_25,listening,' | less
  1. Don't display closed ports:
cat /var/tmp/passer-log | sort -u | grep -v ',closed,' | less
  1. Only display closed ports:
cat /var/tmp/passer-log | sort -u | grep ',closed,' | less
  1. Show all DNS records in the "google.com" domains:
cat /var/tmp/passer-log | sort -u | grep -i 'google\.com\.,' | less
  1. Grab all the DNS address records and create a hosts-like file:
/path/to/make-hosts /var/tmp/passer-log | /path/to/mergehosts.pl >/var/tmp/passer-hosts

"make-hosts" and merge-hosts are separate shell and perl scripts at http://www.stearns.org/passer/make-hosts .

This is just a start! Send in your favourite ways to extract items of interest and I'll add them and give you credit.

BPF filters

The individual record types need certain types of packets to give them their raw data. If you want to include or exclude these, use the accompanying filter.

'IP', IPaddr, 'IP', dead or live, p0f OS description

This needs TCP SYN packets:

'tcp[13] & 0x12 = 0x02

'MA', IPaddr, 'Ethernet', MacAddr, ManufDescription

These come from arp replies(*1):

'arp'

'TC', IPaddr, 'TCP_'Port, closed or open, client description

These need TCP SYN/ACK's, FIN's and RST's(*2):

'tcp[13] & 0x07 != 0'

'TS', IPaddr, 'TCP_'Port, closed or listening, server description

We need TCP SYN's, SYN/ACK's, and RST's to see if the port is open or closed:

'tcp[13] & 0x06 != 0'

To come up with a server description string, we also need to see the ACK packets that make up the bulk of the traffic on the wire:

'tcp[13] & 0x17 = 0x10'

If you want both, just grab all TCP traffic:

'tcp'

'UC', IPaddr, 'UDP_'Port, open or closed, udp client port description

Easiest to just hand it all udp ports and ICMP port unreachables:

'udp or icmp[0:2] = 0x0303'

'US', IPaddr, 'UDP_'Port, open or closed, udp server port description

Same as above:

'udp or icmp[0:2] = 0x0303'

'DN', IPaddr, A,AAAA,PTR,CNAME hostname, possible extra info

UDP or TCP port 53 (*3):

'udp src port 53 or tcp src port 53'

'RO', IPaddr, 'TTLEx', router, possible extra info

We identify routers because they're sending Time-To-Live-Exceeded or unreachable messages:

'icmp[0:2] = 0x0B00 or icmp[0] = 0x03'

*1 This grabs arp requests too, but these are ignored.

*2 The filter technically includes SYNs as well, but that's a small amount of extra data

*3 As of version 1.16, only UDP port 53 answers are extracted.

Sample BPF filters

  1. To drastically reduce the number of packets to be parsed, losing only the tcp server description strings, don't process ACK-only packets:
'not(tcp[13] & 0x17 = 0x10)'

This chops out 90+% of the number and volume of packets to be handled, letting passer keep up with moderate bandwidth links.

  1. If you're not interested in DNS servers:
'not udp src port 53'

There's quite a bit of work to extract dns records; this may also be a good one to turn off if you're trying to keep up with a fast link.

  1. If you want to focus on packets to or from a particular machine or network:
'host 1.2.3.4'
'net 1.2'

More info

Questions? Bug reports? Issues? Try william.l.stearns@gmail.com and please include "passer" somewhere in the subject line.

The post Passer - Passive service locator, a python sniffer that identifies servers, clients, names and more appeared first on Hakin9 - IT Security Magazine.

Memhunter - Live Hunting Of Code Injection Techniques

$
0
0

Memhunter - Automated hunting of memory resident malware at scale.

This project is WORK IN PROGRESS. Expect feature changes and binary releases on the upcoming weeks.

Overview

Memhunter is an endpoint sensor tool that is specialized in detecing resident malware, improving the threat hunter analysis process and remediation times. The tool detects and reports memory-resident malware living on endpoint processes. Memhunter detects known malicious memory injection techniques. The detection process is performed through live analysis and without needing memory dumps. The tool was designed as a replacement of memory forensic volatility plugins such as malfind and hollowfind. The idea of not requiring memory dumps helps on performing the memory resident malware threat hunting at scale, without manual analysis, and without the complex infrastructure needed to move dumps to forensic environments.

The detection process is performed through a combination of endpoint data collection and memory inspection scanners. The tool is a standalone binary that, upon execution, deploys itself as a windows service. Once running as a service, memhunter starts the collection of ETW events that might indicate code injection attacks. The live stream of collected data events is feed into memory inspection scanners that use detection heuristics to down select the potential attacks. The entire detection process does not require human intervention, neither memory dumps, and it can be performed by the tool itself at scale.

Besides the data collection and hunting heuristics, the project has also led to the creation of a companion tool called "minjector" that contains +15 code injection techniques. The minjector tool cannot onlybe used to exercise memhunter detections, but also as a one-stop location to learn on well-known code injection techniques out there.

Architecture deck available here

Example 1: Manual run to exercise detection of reflective DLL injection

Example 2: Manual run to exercise detection of process hollowing injection


Follow author for latest updates about the tool: https://github.com/marcosd4h/memhunter 

The post Memhunter - Live Hunting Of Code Injection Techniques appeared first on Hakin9 - IT Security Magazine.

Viewing all 612 articles
Browse latest View live